
What this article covers is a comprehensive guide to using Meta Business Suite. We’ll explain what it is, show you how to create an account, and explain why it’s useful for your business.
Overview
Nearly $115 billion is spent annually on advertising on Meta (formerly Facebook) platforms by businesses.
Why? It’s quite simple; because it’s effective.
Meta provides excellent tools for monitoring and managing business accounts.
Are you having trouble keeping up with all of the marketing requirements on Facebook and Instagram?
Not remembering to respond to comments or direct messages?
Do you find yourself going crazy trying to keep track of numerous tabs for various accounts and tools like the Ad Manager?
Then you’ll absolutely love Meta Business Suite, formerly known as Facebook Business Suite.
It’s the latest feature added to the platform, and it’s meant to streamline the time-consuming processes involved in maintaining social media profiles like Instagram and Meta for businesses.
So, with that out of the way, let’s get on with the business for the day.
What Is Exactly Meta Business Suite and How Does It Work?
Meta Business Suite is a free tool that lets you manage your Facebook and Instagram accounts (including ads!) from a single, simple dashboard.
You can manage and administrate all of your accounts through the platform, which includes a variety of tools to help you manage your company’s social media presence.
What’s the best part? It’s completely free and available on both mobile and desktop.
With nearly 3 billion monthly active users on Facebook alone, this tool is one of the most effective ways to increase social reach, brand awareness, and sales.
Simply linking your accounts gives you instant access to an overview dashboard of your Facebook Pages and Instagram accounts.
You will be able to do the following:
- make a notification management to-do list
- examine your performance and audience growth insights
- create new posts or stories, or view recent ones
- create or manage recent advertisements
- view your content calendar for inspiration
- communicate with Facebook and Instagram inbox DMs and feedback
- check for Business Suite updates in the Commerce Manager
Why should you sign up for Meta Business Manager?
There are several situations in which you would benefit from having a Meta Business Manager account. Here are a few reasons why you should create an account:
- You’re a brand social media manager: If you’re a social media manager or another member of a company’s marketing team, Meta Business Manager is the tool for you. Multiple people can easily access and manage your Facebook or Instagram business pages with Business Manager.
- You’re a creator or business owner: Business Manager helps you organize and manage your business while also separating your brand from your personal account. Your audience will not be able to see your personal Facebook information; instead, they will associate your brand with the information you choose to share, such as your name, work email, and Pages and ad accounts.
- You manage multiple assets or accounts: If you manage multiple Facebook or Instagram assets for your business, such as Facebook Pages, ad accounts, or apps, having one central platform can help keep everything organized.
- You use third-party vendors: Do you hire a marketing firm or a freelance social media manager to help you create, run, or manage your Facebook Pages or ads? Meta Business Manager makes it simple to grant access to external team members while ensuring that you and your company retain ownership of all assets.
Facebook Business Manager vs. Meta Business Suite
Prior to becoming Meta, Facebook offered both Facebook Business Suite and Facebook Business Manager. Both options are still available in Meta.
The Business Manager is a backend tool that allows you to share or restrict access to your business accounts by assigning one of six different “roles” to those who have access to them.
Front-end management in the Business Suite includes merging notifications, scheduling posts, and managing your inbox.
You’ll love Meta Business Suite if you’re used to Facebook Business Manager! It enables you to consolidate and streamline your activity across Meta’s social media and messenger platforms.
Making Use of Meta Business Suite Insights
Meta Business Suite makes it simple to keep track of your company’s accounts and campaigns across the Meta social and messenger platforms.
Here are some of the insights provided by Meta Business Suite, as well as how to use them:
- Ad Spend: Your ad spend can be tracked across all Meta platforms. You can adjust your spending based on how well you’re performing. For example, if you’re spending a lot of money on Instagram ads but see from other insights that they’re not performing well, you can redirect your budget to the Meta platforms where you’re having more success.
- Engagement: Meta Business Suite displays organic and boosted content engagement. You can see what content performs best and use that to inform future strategies and social media content.
- Audience Demographics: You can view data about the users who interact with your profile and content using Business Suite. You can see where they’re from, their other interests, their age, and other information. You can use this data to continue creating content for your existing users, or you can adjust your strategies if your content isn’t reaching the right people.
How to set up Meta Business Manager in 9 steps
Before you create your Meta Business Manager account, there are a few things you should know:
To create a Facebook Business Manager account, you must first have a personal Facebook account. Then use your personal account to log in and confirm your identity.
There can only be two Business Manager accounts.
Now that those steps have been completed, let’s go over how to set up your Meta Business Manager account.
Step 1. Setup a Business Manager account
- Navigate to business.facebook.com. You can use your existing Facebook or Instagram account or create a new one. The first screen on business.facebook.com asks you to log in with Facebook or Instagram and describes what a Business Manager account will allow you to do: manage your pages, accounts, and business assets; create and manage ads; and track your performance.
- Enter your business and account name in Business Manager to create your business account. To verify the account, you must also enter your name and business email address. To create your account, click Submit.
When you create a business account in Business Manager, you must enter your company and account names, as well as your name and business email address.
- Check your email for a message with the subject “Confirm your business email,” and then click Confirm Now within the message.
- After you’ve confirmed your account, enter your company information. This information includes the legal name, address, phone number, and website of your company.
When you create a business in Business Manager, you must enter the following information: legal business name, country, address, business phone number, website, and tax ID.
Step 2. Register your Facebook Business Page(s)
In this step, you have a couple of options. You have the option of adding an existing Facebook business page or creating a new one. You can request access to someone else’s Facebook page if you manage Facebook pages for clients or other businesses.
That last distinction is critical. While Business Manager can be used to manage your clients’ Facebook pages and ad accounts, it is critical to use the Request Access option rather than the Add Page option. When you add your clients’ pages and ad accounts to your Business Manager, they will have restricted access to their own business assets. That will almost certainly lead to conflict in your business relationship.
We’ll assume you’re managing your own assets rather than acting as an agency for the purposes of this post, so we won’t go into the Request Access process. However, keep this distinction in mind.
If you haven’t already created a Facebook Business page, we have a tutorial that will walk you through the process. Go ahead and read the article below, then return here to add your page to Facebook Business Manager.
Read: How to Create a Facebook Business Page: Best 2023 Practices & Tips
To add your Facebook page to Facebook Business Manager, follow these steps:
- Click Business Assets from the Business Manager menu. Click Pages, then click the blue Add Pages button.
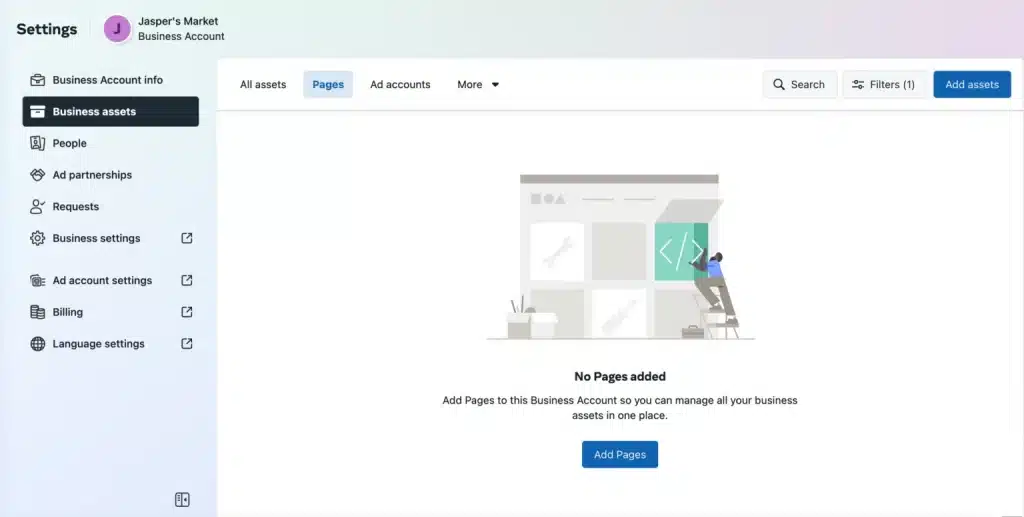
When you’re in the Business Manager dashboard and have selected the Business Assets option in the left-hand menu, click Add Pages in the main window.
- Following that, you’ll be given a few options to choose from. You have the option of creating a new Facebook Page, claiming an existing Facebook Page, or requesting that a Facebook Page be shared with you.
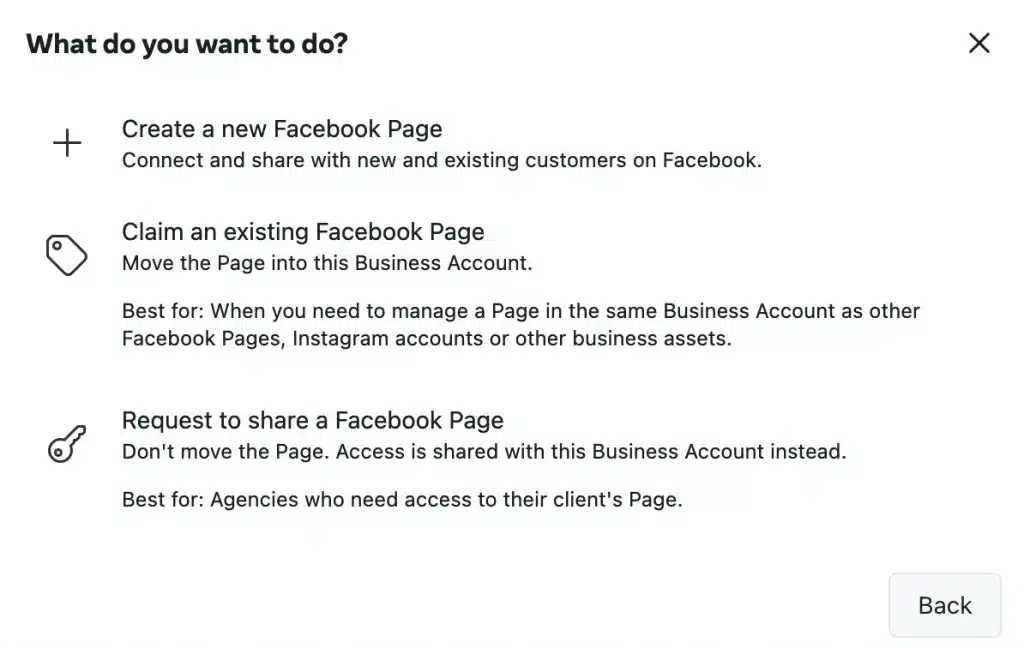
You have three options on this screen in Facebook Business Manager: create a new Facebook page, claim an existing Facebook page, or request to share a Facebook page.
- After clicking Claim an existing Facebook Page, begin typing the name of your Facebook business page into the text box. Your company’s page name should autocomplete below, allowing you to simply click on it. Assuming you have administrator access to the page you want to add, your request will be automatically approved.
You can search for your existing Facebook page after you’ve selected Claim an existing Facebook page.
Step 3. Add your Facebook advertising account (s)
Note that if you don’t add your ad account to Facebook Business Manager, you won’t be able to remove it, which is why it’s important only to add accounts you own. Instead, click Request Access to gain access to a client account.
If you already use Facebook ads, you can connect your existing ad account by doing the following:
- Click Add Ad Account from the Business Manager dashboard.
- Click Add Ad Account once more.
- Finally, enter the ad account ID (found in Ads Manager).
If you don’t already have a Facebook ads account, adding one is similar to adding a Page.
- Select Business Assets from the Business Manager menu. Once there, click the blue Add Assets button in the upper right corner.
- There will be several drop-down menu options to choose from. Choose Advertising, then Ad account.
- Choose “Create a new advertising account,” and enter the information for the new ad account. This information includes the name of your ad account, your time zone, and the currency in which you will pay for your ads.
Step 4. Add people to assist you in managing your Facebook assets.
Keeping up with your Facebook marketing can be a daunting task, and you may not want to tackle it alone. You can add team members to Business Manager to have a large group of people working on your Facebook business page and ad campaigns.
Take note of the access options available before adding people to your account.
Facebook provides three different levels of access:
- Full control: Previously known as “business admin,” this role has complete authority over the account’s settings, business assets, tools, and people. Accounts with full control can also be deleted. This position is ideal for business owners.
- Partial Access: People with partial access can only work on tasks and business assets assigned to them, making them ideal for marketing team members or external vendors.
- Advanced options: Adding this option to a role allows people to work on assigned tasks in addition to the full control or partial access they have. This position is intended for individuals who may require access to financial information (previously the finance editor or finance analyst roles).
Read Also: FACEBOOK MARKETPLACE: Items to Sell, Scam & How to Sell
Here’s how to set up your team once you’ve determined which roles are available.
- Select People from the Business Manager menu. Once there, click the blue Add People button in the upper right corner.
- Enter the business email address of a team member to be added. This could include employees, freelancers, or business partners. You are specifically adding individuals rather than an agency or another business in this step (you can do that in the next step).
- Then, choose the level of access you want to grant them. You can grant these individuals basic account access (select Partial access) or full account access (choose Full control).
Please keep in mind that Facebook recommends limiting full control to a few people.
In the following stage, you can become more specific. Make sure to include people who have work email addresses. Then press the Next button.
After you’ve decided who you want to invite to your Business Manager account, you can choose the level of access you want to give them. The default is partial/basic access.
- Next, decide which business assets you want that person to have access to. The dropdown menu will show all of your business’s Facebook Pages and Instagram accounts.
This menu in Facebook Business Manager allows you to choose which business assets you want to grant access to.
You will have the opportunity to review the invitation before sending it, and they will be able to confirm it. When you’re finished, you can expand your team if necessary.
It should be noted that a Facebook ad account can have up to 25 people associated with it. Then, in order to add more team members, you’ll need to remove some.
Read Also: FACEBOOK CREATOR STUDIO: Eligibility & What You Should Know
If someone with access leaves your company or changes roles, you can revoke their access. Here’s how it’s done:
- People can be found in the left menu of your Business Manager dashboard.
- Click on the appropriate person’s name. Click the three dots in the right corner to change a person’s role or remove them from your team.
- Choose whether to edit their account information, change their business permissions, or remove them from the business account.
Step 5: Connect with your business partners or advertising agency.
If you’re just getting started with Facebook advertising, this may not apply to you, but you can always return to it later.
- Click from your Business Manager dashboard.
- Click Partners from the left menu. Add a new partner to share assets with.
In Business Manager, the Partners menu offers two options: add a partner to share assets with or add a partner to request assets from.
- Your partner must have an existing Business Manager ID, which you should request. They can find it under Business Settings>Business Info in their own Business Manager. Enter the ID and press the Add button.
The newly added business can manage permissions for individuals on their own teams through their own Facebook Business Manager account. That means you don’t have to worry about assigning and managing permissions for all of the individual people who service your account at your agency or partner company; only the partner company needs to do so.
Step 6: Connect your Instagram Account
You can now connect your Instagram account to Meta Business Manager after you’ve set up your Facebook assets.
- Click Business Settings from the Business Manager dashboard.
- Click Instagram accounts in the left column, then Add. Enter your Instagram login information in the pop-up box and click login to connect your account.
A view of the Meta Business Manager dashboard with “Instagram accounts” selected in the left-hand menu. According to the main window, this account does not yet have any Instagram accounts linked to it.
Step 7: Configure Facebook Pixels
What exactly is a Facebook Pixel? Simply put, it’s a small piece of code generated by Facebook for you. When you embed this code on your website, you gain access to data that allows you to track conversions, optimize Facebook ads, build targeted audiences for your ads, and remarket to leads.
Even if you aren’t ready to launch your first ad campaign, we recommend that you set up your Facebook pixel right away. When you’re ready to start advertising, the information it provides will be invaluable.
Our comprehensive guide to using Facebook pixels is an excellent resource that will walk you through everything you need to know about making the most of the information a Facebook pixel can provide. For the time being, let’s configure your pixel from within Meta Business Manager.
- Click Business Settings from the Business Manager dashboard.
- Expand the Data Sources menu in the left column and select Pixels, then Add.
Pixels can be found under the Data Sources menu in your Business Manager dashboard.
- Enter a name for your pixel (up to 50 characters). Enter your website so that Facebook can make the best recommendations for how to configure your pixel, then click Continue. When you click Continue, you are agreeing to the Pixel terms and conditions, which you should read before proceeding.
- Set up the Pixel Now by clicking the button.
- To set up the pixel on your website and begin collecting data, follow the detailed instructions in our Facebook pixel guide.
With your Meta Business Manager account, you can create up to 100 pixels.
Step 8. Boost the security of your account.
One of the benefits of using Meta Business Manager is that it provides additional security for all of your company’s assets.
- Click Business Settings from the Business Manager dashboard.
- Select Security Center from the left menu.
You can select mandatory security settings in Meta Business Manager. You can require two-factor authentication from your page administrators on this screen.
- Configure two-factor authentication. Setting it to “required for Everyone” provides the most security.
It’s time to launch your first Facebook ad now that your account is set up and your pixels are in place.
Step 9: Post your first advertisement
We have a comprehensive guide that explains the strategy and specifics you need to know in order to create compelling and effective Facebook ads. So we’ll just walk you through the steps required to get an ad running in Business Manager.
- In the left column of your Business Manager dashboard, click Ads.
- This will take you to your ads dashboard, where you can view a summary of metrics from recent ads. Click the blue “Create Ad” button in the top right corner to start a new ad.
- Choose your goal, your target audience, your budget and timeline, and your specific ad types and placements. With Automated Ads, you can also boost existing content or receive personalized recommendations. To avoid missing a step, follow our step-by-step instructions for Facebook advertising.
Related Articles
- FACEBOOK SUBSIDIARIES: List of Companies Owned By Meta
- Facebook Logo: What Inspired the Logo? (Detailed History & Evolution)
- Best Investment Management Software In 2023: Features and Reviews
- ORGANIC TRAFFIC: Definition, Examples, How to Increase It & Difference
- Meta Logo: Best Spot-on Rebranding Practices for Any Business