The check-filling process becomes easy for people who fill out checks frequently. Therefore, if you have not written many checks, it can be difficult to know how much money you have in your account. While electronic transfers are becoming the standard, checks are not yet completely obsolete. In this article, you will learn the best order to write a check whether void or personal, and also how to write with cents.
All you need to do is to take your time, read through the article to get the right information that you need to know.
How To Write A Check
There are modern ways to fill or write a check in an easy and understandable way. Below are thus the easy steps to take in writing a complete and perfect check.
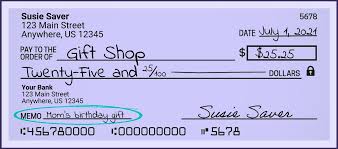
- Date: Check the date in the upper right-hand corner of the page. In the US, month/day/year is standard.
- Recipient: In the space after “Pay to the Order Of,” write the recipient’s name. The cheque is for an individual, organization, or business. When working on a personal project, make sure to include both the first and last name. In business, you must use the full name of the company.
- Amount (Numerical Form): To the right of the recipient’s name, enter the amount in USD.
- Amount (Expanded Word Form): On the next blank line, write it in expanded word form next to the recipient’s name. Instead of cents, use fractions.
- Signature: Sign your name in the bottom right corner of the check and at the bottom of the cheque. Provide your signature on the check to cash it out.
- Memo (Optional): You can also put a note in the lower-left corner of the page where the check line appears. It can also suggest the money needs to go your debt and not something else. If you’re using a check to pay for something at your child’s school, write their name and grade in the memo line.
How To Write A Check With Cents
Understanding the best ways to write a check with cents is another better way of learning the mastery of writing a check. Below are the steps to take when you want to write a check with cents:
#1. Formatting The Dollar And Cent Amounts
- In the “Amount” column, enter a number. The “Amount” column is below the “Date” line and to the right of the “Pay to the Order of” line. You should attach a symbol to the left of the number to help readers identify, for example, $ or £. In this column, write your cheque amount in numbers.
- In cases where the total is even dollars, include the cent and the decimal amount. If the account is $47 even, you can deposit a penny that is worth that much or 47 cents. In this case, you must state that “zero cents” are owed. When using decimals, you start with a digit and then two zeros: 47.00.
- The text size must be specified. To write a cents check, you will notice two lines with and two lines without currency underneath the “Pay to the Order of” line. Writing the sum in words rather than numbers saves time. You should write the price in the list, no matter in dollars or cents; but the percentage, regardless of the unit of currency, should be as a fraction out of 100. A dollar is 45 cents, hence it is 45 cents to the dollar. Even if this is the only rule, it is not the only way to format the text on the line.
- A dollar figure followed by the phrase “and” and a fractional cent amount: 47/100.
- the stated amount and “$50.00”: 47$ and 50/100.
- Some people put a horizontal line after the fractional cent: 47$/100 ——— Other people cannot edit or add to your writing.
- The use of compound numbers. When you want to write a cents check, compound numbers do not fall uniformly throughout decades or centuries. Always use a hyphen between the two components of a complex number such as 47 (as opposed to 40). Example
- Correct: forty-seven
- Incorrect: fortyseven or forty seven
- When you want to write a cents check, it doesn’t matter if the text is lengthy, even if it has to be transcribed literally. Words should be on the appropriate line for a number in the millions, tens of thousands, or hundreds of thousands. Writing in tiny handwriting is necessary. For example
- Correct: two million, five hundred fifty-two thousand, eight hundred forty-seven dollars and 00/100 ——.
- Incorrect: 2,552,847 dollars and 00/100 ——————.
#2. Filling Out The Non-Monetary Fields
- Fill in the date. A little line with the word “Date” appears in the top right-hand corner of the check. To fill in the date on this line, use the proper code for the date.
- Abbreviations use the month/date/year format in the United States. 1/11/15 is written as 1/11 on this date.
- To most of the world, the month, date, and year are ordered sequentially: the same date would be written as November 1st, 2015.
- The date may be presented with year/month/date in several Eastern Asian countries: 2015/01/11.
- To make a major difference, be sure the month and the year you are typing in are in the correct format. To maintain the security of your account, be sure to choose a format appropriate for the nation in which you are a bank
- If needed, comment on the check. While you may not want the check cashed immediately, there may be other reasons. Another reason to write a cents check for more than your budget is to aid someone. The most crucial thing to remember is to postdate the check, so it cannot be paid before that date. This is useful if you have to wait until payday to access your check balance.
- Note that post-dating checks can be illegal if you manipulated the date with the intention of defrauding someone]
- However, if you post-date the check for legitimate reasons, the practice is perfectly legal.
- Fill in the “Pay to the Order Of” column. This sentence follows the one where you stated the word count. The name of the person or firm to whom the cheque is payable. Using a nickname for someone or a company may prevent them from depositing a check.
- To be safe when you write a cents check, always ask who to send the check. The person who will deposit the check will be able to give you the proper legal name.
- Add optional info to the “Memo” line. If you want to insert special information in the Memo section of a check, leave the line at the bottom left blank. “Here’s the money,” “childcare,” or “Happy Birthday!” The check’s details help you remember the spending if you’re required to account for it later. The note line can be used to provide information to the recipient of the check as well as information regarding filing and processing it.
- If you’re paying rent to a landlord with many renters, you might list your address in the memo to remind them which unit you rent.
- If you’re paying a utility bill, you can include your customer account number on the memo line.
- The memo line is optional and can be left blank.
- Sign the check. Just across from the memo line, in the lower right-hand corner. It’s vital that your signature matches the one on the signature card you gave the bank when you created your account. Notify your bank if you’ve modified your signature considerably since starting the account. Otherwise, the individual seeking to cash the check may have difficulty or be accused of forging your signature.
- Never sign a blank check. Because anyone can pick it up and fill in their name and a significant sum of money. They can steal a lot of money if the check has your signature on it.!
How To Write A Void Check
The procedure of voiding a check is used to invalidate checks, set up direct deposits, or pay bills. To avoid someone utilizing your check fraudulently, perform the steps listed below in order carefully.
#1. Voiding A Check You Still Have In Your Possession
- Go and get a pen. People might still “unvoid” your check by erasing your marks even if you used a pencil. Black or blue markers are best to write a void check with. Nothing is more crucial than ensuring that your ideas cannot be erased or disguised.
- Make “VOID” appear next to the payee. An obvious way to show that a check is void is to write “void” across the check-in various locations. You’ll specify who you’re writing the cheque to on the payee line. Writing “void” is evident if you have already written a name there.
- Include the phrase “VOID” in the payment amount field. The box on the right contains the standard monetary value notation. As in the previous step, if you have previously filled in an amount, make it obvious by writing over it.
- The signature box located on the bottom-right of the user profile box should contain the letters “VOID”. Additionally, strike through the signature. You can void your check by writing “void” in large letters across the front, and write nothing in the back so there are no chances of someone cashing it without authorization.
- Make a voided check recording. Take careful note of any void checks recorded in your check register or checkbook as well as your internet banking software. to avoid confusion in the future, it is necessary to preserve accurate financial records.
In your checkbook or register write down that the check was made void by you and include a few words on the reason why. For example, “wrote the wrong amount.”
Sometimes, you need a write void check to set up direct deposit, typically with a new employer. Increasingly these payments are made by electronic direct deposit rather than the distribution of paper checks. To write a void check is a common way to provide your account details to the payer. Typically this will be a blank check that you are asked to submit along with a Direct Deposit Authorization Form, or something similar.
#2. Canceling A Check After You Have Sent It
- The details must be in place. It is very important that you move immediately if you want to stop a check payment after you have submitted it. To write a void check typically incurs a cost, but this is different. Do your research and bring all of the relevant information with you when you visit the bank to cancel your check. It’s important to note that this information can be different depending on the bank, but you should make sure you have all the details:
- All of the information on the check, including the check number, the amount the check was for, and the date of the check.
- When writing out a check, you need to specify who or what it is for.
- It is to prevent you from writing an incorrect amount on the cheque.
- Void the check through the internet. You will most likely be able to cancel checks using your online banking account if your bank allows it. You must get this done immediately. The only way to halt it is by contacting your bank and getting a “Stop Payment Order” issued on your account.”
- A stop payment order instructs a bank not to pay an uncashed cheque. If requested promptly, the payer’s account will not be debited. Usually, banks charge for this service.
- Log in to your account and explore your bank’s customer care offerings. If you can stop or cancel a check payment.
- Copy the number correctly or you’ll cancel the wrong payment.
- Talk to your bank about it. Banking directly over the phone is another option if you don’t have access to the internet, or if you prefer dealing with a real person. In order to stop the transaction, you will be requesting them for a “Stop Payment Order.” Use of the phone is a fantastic alternative because using it saves time and gets you through to customer service quickly.
- A stop payment order instructs a bank not to pay an uncashed cheque. If requested promptly, the payer’s account will not be debited. This service is usually charged.
- Before you contact, gather the same information you would need to cancel a check online: the check number, amount, and date; the payee; and the reason you need to stop payment.
Reasons For Voiding A Check
Remember, if a payment is returned for any reason, the issuer will cancel the check. To summarize, if you are in one of the following situations, you should be able to void a check.
- To start making regular, immediate payments You may have to void a check in order to set up electronic payments, such as a person or company payments. Voiding a check could be an important component of setting up automated payments if your vendors prefer to be paid electronically.
- In order to receive direct deposit. To use direct deposit, your employer needs information such as your bank account number and routing number to obtain the funds. Voiding a check can be a straightforward way to deliver that information.
- Regular payments on bills. to make online payments, you must first submit a voided check to set up recurring payments from your checking account.
How To Write A Personal Check
As recently as fifty years ago, to write a personal check was the most popular way to pay for virtually everything. Checks are rapidly becoming obsolete thanks to debit cards, direct deposit, quick pay services, and online bill pay.
Newcomers should be aware that to write a personal check may look complex because of all the lines and gaps. So, with this, we’ll proceed through the process of writing a check one step at a time.
Step 1: Enter The Date
You’ll find a blank place at the top right of your check to put in the date. For the most part, to write a personal check, this is the date you should be writing the check, but you may sometimes “postdate” it in certain circumstances. Even if you use the wrong date format, as long as it has the correct day, month, and year, it doesn’t matter.
Step 2: Fill Out The Payee
Once the payee information has been filled in when you write your personal check, the following step is to finalize the transaction. This will be the name of a person or business in most cases. Therefore to clearly write on the line that has the word “Pay to the Order” is highly recommended. For fraud protection, it is also a good idea to include your entire name.
Step 3: Fill Out The Check Amount
Most checks have a dollar sign in an empty slot to the right of the payee line. Once you’ve picked who you’d like to pay, enter the amount. Your figures must only be numbers. No dollar sign. Make cautious to type clearly to avoid confusion while reading the check’s amount. This box also contains $0.02 and cents ($0.02 and cents). Thus in some cases, you can express cents in multiple ways. To write your personal check, you will however show a decimal place, using a decimal point like this: $25.01.
Some people, however, write their cents as fractions to avoid mixing up the decimal point and comma. Like this: $25-01 100
Step 4: Write Out The Amount In Words
A blank line with the word “Dollars” adjacent to it is usually found below the payee line. You should write your personal check amount here; because this double-checks at the bank. If you have difficulties reading the numbers, the words give a backup. When words and numbers don’t match, banks usually use words to pay your cheque. Include both dollars and cents, and use straightforward language. Please use the term “and” when writing dollar and cent figures to avoid consumer confusion. It’s also commonly written as a fraction. Remember to hyphenate numerals between 21 and 99. In our example, “$25” should be written. Therefore you need to use a line instead of the whole line to block off the rest. Also adding extra words after sending the check makes it impossible to find your terms.
Step 5: Fill in the Memo (Optional)
Though the memo section is optional, it is critical to track your spending. Informing them of the payment’s purpose is a good idea. If you are paying a utility bill, you may write “January Gas Bill” on this line. You can enter your tax ID number or a billing account number if you pay federal taxes. If your personal check gets separated from your bill when you write it, use this approach to reattach it.
Clearing the memo section helps both parties keep organized.
Step 6: Sign The Check On The Signature Line
Signing your name completes the check. This is a vital step that is easily missed. Not processing a check with an error in another section is required, but having the person sign the check is optional (such as returned check fees, late fees, or additional expenses).
The signature part is in the lower right corner. Signing your name completes the transaction.
How Do You Write a Check for Blank Checks?
- Name and address in upper left corner.
- Write the check number in the upper right corner.
- Subsequently, the date
- Note the check’s purpose in the left “Memo” box. Optional.
- Sign the check in the lower right.
What Is the Safest Way to Write a Check?
There is a safe way to write a check and that includes:
- Enter The Date
- Fill Out The Payee
- Fill Out The Check Amount
- Write Out The Amount In Words
- Fill in the Memo (Optional)
- Sign The Check On The Signature Line
How Do You Write a Check for Cash for Someone Else?
The third party’s name should be written after “Pay to the Order of” below your signature. It’s important to write the name of the person you’re giving the check to in the area below your signature that says “Endorsement.” This informs the bank that you are endorsing the check’s transfer of ownership.
How Do You Start a Check?
The third party’s name should be written after “Pay to the Order of” below your signature. It’s important to write the name of the person you’re giving the check to in the area below your signature that says “Endorsement.” This informs the bank that you are endorsing the check’s transfer of ownership.